Friday, June 26, 2009

Summer Refreshment


As we get into the thick of summer, you might be looking for a great way to cool off. Check out these unique summer cocktails for a burst of refreshment!

P.S: If you like them, you may even consider adding it to your wedding menu as a tasty signature drink for your guests to enjoy!

Queensparke Swizzle
  • 2 ounces light rum
  • 1 ounce freshly squeezed lime juice
  • .75 ounces simple syrup
  • 2 dashes Angostura bitters
  • 3 dashes Peychaud's bitters
  • 1 brown sugar cube
  • 1 handful mint
  1. Add mint into a shaker and muddle
  2. Add lime juice, simple syrup, and brown sugar cube into the shaker and fill with ice
  3. Shake vigorously 6 - 8 seconds
  4. Strain ingredients into a glass tree-quarters full of crushed ice
  5. Add bitters and top with crushed ice
  6. Garnish with a mint sprig
Platino Fresco

  • 2 ounces 100% blue agave tequila
  • 1 ounce freshly squeezed lime juice.75 ounces simple syrup
  • 3 slices cucumber
  • 1 handful mint
  1. Add cucumber and mint into shaker and muddle
  2. Add tequila, lime juice, and simple srup into the shaker and fill with ice
  3. Shake vigorously for 6 - 8 seconds
  4. Strain ingredients over fresh ice in a glass (may also be served up)
  5. Garnish with a cucumber slice with a mint sprig through the center

Gold & Delicious

  • 2 ounces applejack brandy
  • .75 ounces freshly squeezed lemon juice
  • .75 ounces clover honey syrup
  1. Add all ingredients into a shaker and fill with ice
  2. Shake vigorously for 6 - 8 seconds
  3. Strain ingredients into a glass
  4. Garnish with a fan of apple slices

Tuesday, June 23, 2009

DIY Centerpieces: Floating Candles


Candles are one of the most popular items used in wedding decor. The soft lighting created by a candle's flame truly adds a touch of romance and intimacy. But rather than just using an ordinary votive or tealight candle, consider incorporating a "spiced up" floating candle into your centerpieces, on your cake table, or as decor accents. To "spice up" your candles fill a glass vase approximately half way with fresh fruit or flowers. Consider lemons, limes, oranges, cherries, and almost any type of fresh flower heads. Carefully fill the container with water, leaving about 2 inches at the top. Place your floating candle on top of the water.

Don't be afraid to get creative! There are tons of different options for filling your vases. If you are having a fall wedding, you might use colorful leaves. If you are having a winter wedding or glitz & glam decor, you might use diamonds or rhinestones. The possibilities are endless!

Friday, June 19, 2009

Give the Gift of Cocktails

If you are on Facebook (and who isn't these days), you have probably received at least one "virtual cocktail" from a friend. I know I have and I have to say it is pretty fun to pass them back and forth. But, wouldn't it be even better if they were real. Well, Patrick Ledbetter evidently felt the same way and decided to start a new website called GiveReal.com where you can give the gift of real, live cocktails to your friends. Simply select a drink for your friend (or at least a suggested drink, they get to choose their own), type in their name and email, add a personal message, and pay with a credit card. Your friend is then notified via email that they have a gift, which they can redeem at any bar, restaurant, club, or cafe that accepts credit cards. How cool is that! Now you can celebrate with your friends and family, even if they are miles away!

Tuesday, June 16, 2009

DIY Centerpieces: Jeweled Lamp Shades


To create a truly unique centerpiece for your guest tables, cocktail tables, or even as a decor accent for your home, simply add modern or vintage jewelry to the shade of a small lamp. Slip bracelets or necklaces over the top of the shade, using the slope of the shade to hold them in place. Or...you can attach mix-and-match clip earrings around the edges. This is an inexpensive way to transform a plain, ordinary accessory into something original and fabulous!

Thursday, June 11, 2009

Raise the Cake

Are you looking for something besides the good 'ol, traditional silver cake stand to show off your wedding cake? Check out Raise the Cake, a new company that designs custom cake stands to match your wedding decor. There are several pre-designed options, from modern to glitzy to fun and funky. Or...you can set up a consultation to have a stand custom designed to your exact wants and needs. This is a great way to express your personality and really make your wedding cake stand out!

Wednesday, May 27, 2009

A Happy Couple: Lisa & John


Lisa & John
February 14, 2009

I am so happy to have had the opportunity to work with this terrific couple! Lisa & John are such fun, caring, easy going, happy people and definitely 100% in love. I adored their relationship and the special way that they looked at each other...especially on their wedding day.

Lisa & John chose "the day of love" to celebrate their marriage, which seemed to be very fitting. The ceremony was held at Emmanuel Baptist Church, where a close friend and pastor performed their service. Their palette of cherry red and baby pink created a very beautiful reception at Glassworks. The soft candlelight that surrounded the centerpieces added the perfect touch of romance. A breakfast buffet was served, complete with made-to-order omelets. After dinner, guests enjoyed mini wedding cakes topped with fresh fruit and edible flowers, as well as their signature drink, a Washington Apple Martini.

Lisa & John had a perfect day. The weather might have been a little chilly, but the rain held off, and (thankfully) there was no snow to be seen. Thank you to Lisa & John for allowing me to be a part of your special day and to all of the wonderful vendors who helped to make it a success!

Tuesday, May 19, 2009

The Perfect Palette

You just have to check out The Perfect Palette blog! I came across this fabulous site while browsing the internet and absolutely love it. They have creative ideas and photos for virtually every color palette and combination. It is a great way to visualize how your color selections will look on your wedding day. And if you are torn between a few options or don't have a clue what you want, this site can definitely help you make an informed decision. The possibilities are endless!

Friday, April 24, 2009

Unique Guest Books

Oh yes...the infamous wedding guest book. Almost every couple that I work with asks this question: What can we do with our guest book besides just having a list of signatures? Many couples today are deciding to move away from the traditional "autograph book" and are in search of something that will be more fun and entertaining to look back at and that will truly capture memories of their special day. 

There are numerous fun and creative options out there, one being a scrapbook style album from the Guestbook Store. Each guest is given their own page where they can write wishes for the bride and groom, stories about the couple, how they are acquainted, where they traveled from, and even draw their own pictures. After the wedding, you simply place all of your guests' pages into your album. It makes for a great keepsake and will be much more fun to look at down the road than a list of autographs.

The Guestbook Store has over fifty different album designs to choose from and numerous different page layouts (both formal and casual) so that you can create a book to reflect your tastes and personality. Check it out online at www.guestbookstore.com.

Check back for more fun and unique guest book ideas!

Tuesday, April 21, 2009

Spring Craft: Graduation Gift Box

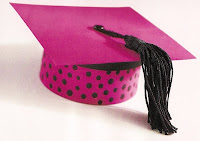
Graduation is right around the corner! If you have a friend or relative graduating this year, consider making your own unique gift box. This miniature cap has a secret compartment to hold a small gift or money. It is simple and fun to make and is sure to be a big hit at the party!


GRADUATION GIFT BOX
Supplies:
1. 4" square piece of cardboard
2. 2.75" diameter round cardboard box
3. Acrylic paints in red and black (or other desired color combinations)
4. Flat and round paint brushes
5. Paper fastener
6. Thick white craft glue
7. Ice pick
8. Black tassel
9. Fine liner brush

Directions:
Paint the square piece of cardboard and round cardboard box red or other desired color. Let dry. Paint a second coat if needed. Paint the Paint the lid black inside and out. Let dry. Paint the head of the paper fastener black. Let dry.

Glue the top of the lid to the center of the painted cardboard square. Using an ice pick, pierce a small hole in top center of lid, through both the glued square and the lid.

Insert the painted fastener through lid from the outside to inside. Loop a small black tassel around the head of the fastener. Press firmly in place and spread metal fasteners apart to hold in place.

Finish the round box by painting stripes or dots. Paint black stripes with a fine liner brush. Paint dots by dipping the handle end of a paintbrush into paint and dotting onto the surface.

Friday, April 17, 2009

Gown Preservation

Probably one of the last things you are thinking about during your wedding planning process is how to care for your gown AFTER the wedding. Thankfully, Slate NYC is making it easier for brides to make these arrangements. They are offering the first world-wide dress cleaning and preservation service. Simply go online to www.slatenyc.com, enter your location, dress designer, retail value, and description, and you will be given an instant quote (including shipping). Once your order is placed you will receive a prepaid, insured garment box to ship your gown in. It will be returned to you, ready to be stored, in about 2 weeks. You can also track minute-by-minute progress of your order online. At least one thing on your list just got a little bit easier!


Tuesday, April 14, 2009

Spring Craft: Color Burst Seed Balls

I recently made a trip to Borders and picked up a great new book called "Simple Crafts". It is filled with tons of great crafts for every season. I am super excited to try these out. Of course, finding the free time is somewhat hard to do.

I decided to share these crafts on my blog, so that those of you who are crafty AND have some spare time might be able to enjoy them as well. Many of these crafts can be used as wedding centerpieces or other decor (either as is or maybe altered somewhat), so get creative and think how you might be able to incorporate them. Consider simply changing the colors to match your wedding day scheme or (with the craft below) cover the foam balls with crystals rather than painted seeds. Most of the crafts I am going to share are very simple and are perfect for the DIY bride. So...please enjoy and Happy Crafting!!


COLOR BURST SEED BALLS
Supplies:
1. 2.5" - 3.5" plastic foam balls (such as Styrofoam)
2. Rice, beans, leaves, sunflower seeds, and raffia
3. Paper plate
4. Craft stick
5. Thick white craft glue
6. Straight pins
7. Acrylic paints in hot pink, lavender, yellow, green, and orange
8. Medium size flat paint brush
9. Gold highlighting paint such as Rub'n'Buff
10. Narrow gold ribbon
11. Multicolored beads

To cover a ball with small items:
Fill a paper plate with rice, beans, or seeds. Using a craft stick coat one section of the foam ball at a time with a generous amount of glue. Roll the coated ball in the plate or se our fingers to place the items on the foam ball. Cover the entire ball.

To cover a foam ball with raffia:
Spread glue randomly around the ball. It does not have to be entirely covered. Begin wrapping around the ball in one direction. When an area is covered, continue wrapping in the opposite direction. Continue until the ball is completely covered. Use straight pins to hold the raffia in place until dry.

To cover the ball with leaves:
Use semidry leaves, not too dry or brittle. Spread glue on back of leaves and press onto ball. Continue to glue and overlap the leaves until the ball is covered.

Paint each covered ball a different color using desired colors of paint. Using a medium-size paintbrush, paint with a generous amount of paint, working the paint into the crevices. Let dry.

Use a very small amount of gold paint on your fingertip. Gently rub gold over raised areas to create a highlight.

If desired, wrap balls with gold ribbon threaded with colored beads.

Friday, April 3, 2009

Give the Gift of Flip Books


If you are struggling with a great gift idea for loved ones, consider making your own wedding flip book. Flip books are bound keepsakes created from a 10 - 30 second action sequence from a video recorder or camera phone. Simply visit www.flipclips.com to upload your footage and select your personalized book cover. Prices range from $5 - $20 depending on the size and number of pages. Consider using footage from your first dance, cake cutting, bouquet toss, or your walk down the aisle for a meaningful memento your friends and family will love!

Tuesday, March 24, 2009

Honeymoons for Wine Lovers

If you are a couple that loves wine, beautiful landscape, and peaceful serenity, then you might consider booking your honeymoon in one of these great wine-growing regions of the world. After all, what better way to unwind after months and months of wedding planning than sipping a glass of your favorite wine, overlooking rolling green mountains, and soaking in some much-needed alone time with your new husband! 

1. Charlottesville, Virginia
2. Ensenada, Mexico
3. Front Range, Colorado
4. Fredericksburg, Texas
5. Napa Valley, California
6. Niagara-on-the-Lake, Ontario
7. Okanagan Valley, British Columbia
8. Seneca Lake, New York
9. Williamette Valley, Oregon
10. Yakima Valley, Washington

Friday, March 20, 2009

"Go Green" Tips

Check out the tips below for creating a "Green" wedding!

1. Consider using organically grown flowers in your centerpieces and/or bouquets. 
2. For centerpieces or table decor, use potted plants or miniature bushes that your guests can take home and plant.
3. Create the foundation for your environmentally friendly wedding by sending wedding invitations made from 100% recycled paper. Continue this trend throughout your wedding by using the same paper for menu cards, place cards, programs, and thank you notes.

Tuesday, March 17, 2009

Getting your Groom involved

Planning a wedding can certainly be overwhelming and stressful. If you are ready to hand over some of the items on your checklist, consider asking your Groom for help. Click here to check out our list of easy ways to get him involved. He will enjoy contributing and you will have less to worry about!

Tuesday, February 24, 2009

DIY Votive Favors

These votive holders are a great (and easy) idea for DIY favors. Consider hosting a "dinner night" for your bridesmaids, mom, and future mother-in-law and have them help assemble. It will be a great bonding time!


Supplies:
  • Glass votive cups with a smooth surface that don't taper much
  • Measuring Tape
  • 1/8" double sided adhesive tape
  • Paper or fabric of your choice
  • Pencil
  • Scissors or paper cutter
  • Cardboard or sheet of heavy cardstock
Directions:
  1. Create a template in order to make cutting paper to the right dimensions easy. To do this, you'll need to determine what size strips to cut. First, measure around the circumference of the cup and add 1/4" to the length. Then measure the height of the cup and cut the corresponding measurements for the cardboard or heavy cardstock. Note: covering votive cups that taper from top to bottom is a bit trickier; there needs to be a slight curve to the top and bottom of the paper when it's cut. To get the proper shape for your template for tapered votives, wrap a piece of scrap paper firmly around one of the votive cups ad hold it in place. With a pencil, trace along the top rim and bottom edge of the holder onto the paper. Unroll the paper and cut out the shape, extending the length 1/4" to create a small overlap when the votive is wrapped. Copy the shape onto cardboard or cardstock and cut it out to make a reusable template.
  2. Now that you've determined the correct size and shape of the wraps you'll be using, you can cut them out of the decorative papers. Straight-edge scissors are the most obvious choice here, but decorative scissors from craft stores can be really fun. Try using small scalloped or pinking edge scissors for a look that is unique.
  3. Attach the papers to the votive cups by applying a length of 1/8" adhesive tape from top to bottom. (The peel off tape usually has a red liner; remove this liner from the tape) Line up the edge of one of the wraps over the adhesive and press down to secure it. Wrap the paper tightly around the votive cup and apply another strip of tape under the unsecured edge of the paper. Remove the tape liner and press the adhesive to the votive cup.
Note: You can use this same idea to make custom match boxes. Just remember to leave the match strike area exposed so that guests can light the matches later.

This project was taken from the book The DIY Bride by Khris Cochran

Great Stress Relievers

Let's face it...planning a wedding can be stressful and overwhelming. Before you know it your weekends are packed full with florist appointments, dress fittings, tastings, and venue shopping. It is very easy to get bogged down and lose sight of the bigger picture. 

To avoid this scenario, make sure that throughout the planning process you take the time to enjoy your relationship and each other's company. Plan special "dates" where the two of you can relax and remind yourselves of why you are getting married. This is sure to rejuvenate you and keep that flame alive!

Here are some ideas to get your imagination going...

1. Go on a weekend getaway to a bed & breakfast
2. Go horseback riding
3. Take a hot air balloon ride
4. Go to a couple's spa
5. Pack a lunch and have a picnic at a local park
6. Have a game night
7. Tour a local vineyard and do some wine tasting
8. Visit an amusement park
9. Take dance lessons
10. Visit a local museum that you have never had the chance to explore

Go Green!

Are you looking to "go green" for your wedding? Check out Cream City Ribbon. They offer a huge selection of biodegradable ribbon in a range of colors and patterns. You can even customize your ribbon with your names, wedding date, or your own special saying in a variety of colors and font styles! 

Noteworthy Collections

I have to admit that I am a sucker for stationery. I love different types of papers...textures, colors, patterns, shapes, sizes...everything. And I won't even get started on envelopes and all of the super cool ways to package and send notes, cards, and anything else for that matter. So, needless to say, when it came down to selecting my own personal stationery I had a very difficult decision ahead of me. One aspect of sending mail that often gets overlooked is the return address. For myself, I knew I wanted to bypass the traditional rectangular sticker with my initial or some cute little picture on it, but I wasn't sure what else was out there. Then...I came across the Noteworthy Stamp Collection. I had to have it! Noteworthy stamps are circular stamps that can be customized with not only your address, but with a monogram, initial, or just about anything. They have hundreds of options to choose from, all of which are very classy and stylish. 

Noteworthy stamps would not only be great for your personal life, but would be fantastic for wedding favor tags, napkin rings, menu cards, and a whole slew of other items. What a great way to personalize your wedding! They are available online and only run about $40 each, quite a bargain in my opinion.

Personalized Napkin Rings

In a recent issue of Modern Bride, I came across a fantastic article called "100 Things We Love". After looking at all of these dandy wedding picks (and the prices), I too fell in love. What especially caught my eye were personalized paper napkin rings from ForYourParty.com. You may be thinking...paper? But these napkin rings are truly elegant wrapped around a colorful cloth napkin and can be custom designed to match your colors, initials, and font style. And even better...they are only $33 for 50. It is definitely worth checking out.

Check back soon...I will be sharing more of my favorite wedding must-haves!

Saturday, February 7, 2009

Magnet Street

If you are looking for a save the date that will really impress your guests, consider sending them a magnet. Guests can stick this on their refrigerator and continually be reminded of your upcoming celebration and all of the fun things that are in store. There are many websites that offer this type of product, but I would recommend checking out Magnet Street. I came across their website recently and was impressed with their fabulous selection of designs, colors, themes, and sizes. There are so many great ways to personalize your magnets. They also offer a beautiful line of invitations, reception items, thank you notes, and labels. Make sure to check it out!

Thursday, February 5, 2009

Get Married

For as long as I can remember, I have always loved reading wedding magazines and books and watching wedding shows on TV. It wasn't until recently though that I realized I am absolutely addicted, especially to the Lifetime series "Get Married". The show is hosted by world-renowned event designer, Colin Cowie, and is jam packed full of ideas, suggestions, tips, and hot new wedding products. They always feature a "real life" wedding and it is so fun too see all of the photos and great ideas. "Get Married" airs on Lifetime every weekday at 7:30am. It would be the perfect show to watch while you are getting ready for work or, if you have the amazing DVR, record and watch whenever you get some free time. They also have a great website filled with pictures, ideas, a wedding shop, planning tools, and a blog where you can post about your own wedding or read posts by other brides. I hope you enjoy it!


Monday, January 5, 2009

Happy New Year

Happy 2009! New Years has always been one of my favorite times of the year. I love the parties, dinners, silly hats, champagne toasts, and even those noisy horns that unroll as you blow into them. But most of all I love the feeling of a new year, a new beginning, and the opportunity to make time for those things that just seem to slip by year after year. Sometimes those resolutions still don't work out, but it is a great feeling that this is your year for success and that you have the opportunity to make it happen!
                                   
In keeping with the new year, I thought I would share the rather neat idea of personalized champagne and wine bottles. This would be great as a bridal party gift, part of your welcome baskets, or even as guest favors at the reception. After all...who doesn't love a nice bottle of wine or champagne? And, even after the contents are enjoyed, the bottle will still serve as a lovely memento from your wedding day. 


There are many companies and websites that offer these products, but one of my favorites is www.signaturewines.com. They offer a nice selection of varietals at a very affordable price and their selection of label templates is outstanding. You can even order just the personalized labels for your own bottles if you happen to make your own wine or have a specific brand that you would rather pick up at the store. Either way, your very own wine bottles would add a unique and personalized element to your wedding day!

I hope you enjoyed your new year and best wishes for 2009!