Showing posts with label DIY. Show all posts

Tuesday, June 23, 2009

DIY Centerpieces: Floating Candles


Candles are one of the most popular items used in wedding decor. The soft lighting created by a candle's flame truly adds a touch of romance and intimacy. But rather than just using an ordinary votive or tealight candle, consider incorporating a "spiced up" floating candle into your centerpieces, on your cake table, or as decor accents. To "spice up" your candles fill a glass vase approximately half way with fresh fruit or flowers. Consider lemons, limes, oranges, cherries, and almost any type of fresh flower heads. Carefully fill the container with water, leaving about 2 inches at the top. Place your floating candle on top of the water.

Don't be afraid to get creative! There are tons of different options for filling your vases. If you are having a fall wedding, you might use colorful leaves. If you are having a winter wedding or glitz & glam decor, you might use diamonds or rhinestones. The possibilities are endless!

Tuesday, June 16, 2009

DIY Centerpieces: Jeweled Lamp Shades


To create a truly unique centerpiece for your guest tables, cocktail tables, or even as a decor accent for your home, simply add modern or vintage jewelry to the shade of a small lamp. Slip bracelets or necklaces over the top of the shade, using the slope of the shade to hold them in place. Or...you can attach mix-and-match clip earrings around the edges. This is an inexpensive way to transform a plain, ordinary accessory into something original and fabulous!

Tuesday, April 21, 2009

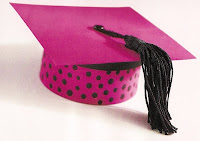
Spring Craft: Graduation Gift Box

Graduation is right around the corner! If you have a friend or relative graduating this year, consider making your own unique gift box. This miniature cap has a secret compartment to hold a small gift or money. It is simple and fun to make and is sure to be a big hit at the party!


GRADUATION GIFT BOX
Supplies:
1. 4" square piece of cardboard
2. 2.75" diameter round cardboard box
3. Acrylic paints in red and black (or other desired color combinations)
4. Flat and round paint brushes
5. Paper fastener
6. Thick white craft glue
7. Ice pick
8. Black tassel
9. Fine liner brush

Directions:
Paint the square piece of cardboard and round cardboard box red or other desired color. Let dry. Paint a second coat if needed. Paint the Paint the lid black inside and out. Let dry. Paint the head of the paper fastener black. Let dry.

Glue the top of the lid to the center of the painted cardboard square. Using an ice pick, pierce a small hole in top center of lid, through both the glued square and the lid.

Insert the painted fastener through lid from the outside to inside. Loop a small black tassel around the head of the fastener. Press firmly in place and spread metal fasteners apart to hold in place.

Finish the round box by painting stripes or dots. Paint black stripes with a fine liner brush. Paint dots by dipping the handle end of a paintbrush into paint and dotting onto the surface.

Tuesday, April 14, 2009

Spring Craft: Color Burst Seed Balls

I recently made a trip to Borders and picked up a great new book called "Simple Crafts". It is filled with tons of great crafts for every season. I am super excited to try these out. Of course, finding the free time is somewhat hard to do.

I decided to share these crafts on my blog, so that those of you who are crafty AND have some spare time might be able to enjoy them as well. Many of these crafts can be used as wedding centerpieces or other decor (either as is or maybe altered somewhat), so get creative and think how you might be able to incorporate them. Consider simply changing the colors to match your wedding day scheme or (with the craft below) cover the foam balls with crystals rather than painted seeds. Most of the crafts I am going to share are very simple and are perfect for the DIY bride. So...please enjoy and Happy Crafting!!


COLOR BURST SEED BALLS
Supplies:
1. 2.5" - 3.5" plastic foam balls (such as Styrofoam)
2. Rice, beans, leaves, sunflower seeds, and raffia
3. Paper plate
4. Craft stick
5. Thick white craft glue
6. Straight pins
7. Acrylic paints in hot pink, lavender, yellow, green, and orange
8. Medium size flat paint brush
9. Gold highlighting paint such as Rub'n'Buff
10. Narrow gold ribbon
11. Multicolored beads

To cover a ball with small items:
Fill a paper plate with rice, beans, or seeds. Using a craft stick coat one section of the foam ball at a time with a generous amount of glue. Roll the coated ball in the plate or se our fingers to place the items on the foam ball. Cover the entire ball.

To cover a foam ball with raffia:
Spread glue randomly around the ball. It does not have to be entirely covered. Begin wrapping around the ball in one direction. When an area is covered, continue wrapping in the opposite direction. Continue until the ball is completely covered. Use straight pins to hold the raffia in place until dry.

To cover the ball with leaves:
Use semidry leaves, not too dry or brittle. Spread glue on back of leaves and press onto ball. Continue to glue and overlap the leaves until the ball is covered.

Paint each covered ball a different color using desired colors of paint. Using a medium-size paintbrush, paint with a generous amount of paint, working the paint into the crevices. Let dry.

Use a very small amount of gold paint on your fingertip. Gently rub gold over raised areas to create a highlight.

If desired, wrap balls with gold ribbon threaded with colored beads.

Friday, April 3, 2009

Give the Gift of Flip Books


If you are struggling with a great gift idea for loved ones, consider making your own wedding flip book. Flip books are bound keepsakes created from a 10 - 30 second action sequence from a video recorder or camera phone. Simply visit www.flipclips.com to upload your footage and select your personalized book cover. Prices range from $5 - $20 depending on the size and number of pages. Consider using footage from your first dance, cake cutting, bouquet toss, or your walk down the aisle for a meaningful memento your friends and family will love!

Tuesday, February 24, 2009

DIY Votive Favors

These votive holders are a great (and easy) idea for DIY favors. Consider hosting a "dinner night" for your bridesmaids, mom, and future mother-in-law and have them help assemble. It will be a great bonding time!


Supplies:
  • Glass votive cups with a smooth surface that don't taper much
  • Measuring Tape
  • 1/8" double sided adhesive tape
  • Paper or fabric of your choice
  • Pencil
  • Scissors or paper cutter
  • Cardboard or sheet of heavy cardstock
Directions:
  1. Create a template in order to make cutting paper to the right dimensions easy. To do this, you'll need to determine what size strips to cut. First, measure around the circumference of the cup and add 1/4" to the length. Then measure the height of the cup and cut the corresponding measurements for the cardboard or heavy cardstock. Note: covering votive cups that taper from top to bottom is a bit trickier; there needs to be a slight curve to the top and bottom of the paper when it's cut. To get the proper shape for your template for tapered votives, wrap a piece of scrap paper firmly around one of the votive cups ad hold it in place. With a pencil, trace along the top rim and bottom edge of the holder onto the paper. Unroll the paper and cut out the shape, extending the length 1/4" to create a small overlap when the votive is wrapped. Copy the shape onto cardboard or cardstock and cut it out to make a reusable template.
  2. Now that you've determined the correct size and shape of the wraps you'll be using, you can cut them out of the decorative papers. Straight-edge scissors are the most obvious choice here, but decorative scissors from craft stores can be really fun. Try using small scalloped or pinking edge scissors for a look that is unique.
  3. Attach the papers to the votive cups by applying a length of 1/8" adhesive tape from top to bottom. (The peel off tape usually has a red liner; remove this liner from the tape) Line up the edge of one of the wraps over the adhesive and press down to secure it. Wrap the paper tightly around the votive cup and apply another strip of tape under the unsecured edge of the paper. Remove the tape liner and press the adhesive to the votive cup.
Note: You can use this same idea to make custom match boxes. Just remember to leave the match strike area exposed so that guests can light the matches later.

This project was taken from the book The DIY Bride by Khris Cochran